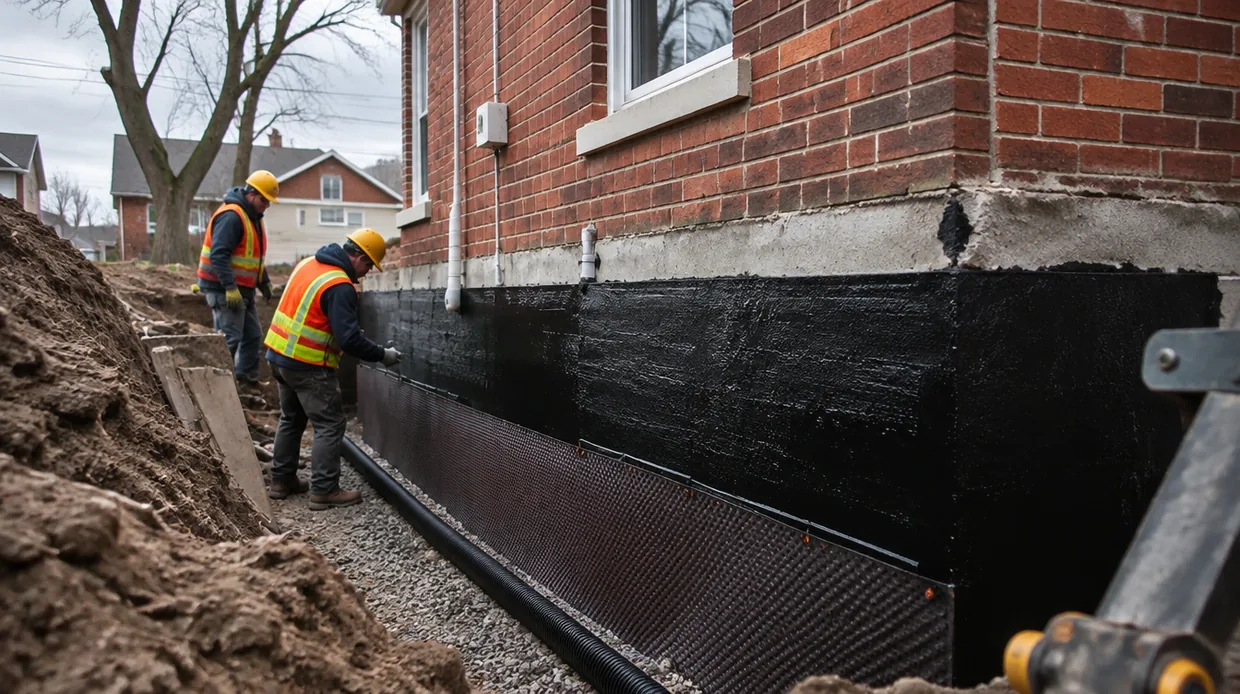
Exterior basement waterproofing is the one repair that stops water before it ever touches your foundation, and it is also the one that looks most dramatic from the street: a trench around the house, a machine in the side yard and a black wall where the soil used to be. This guide walks through how the process works in Toronto, stage by stage, so you know what the crew is doing each day, what you should see and what to ask. It is written as a companion to our exterior basement waterproofing service page, which covers the system and pricing. Here we go deeper on the sequence on site.
Short version: exterior basement waterproofing excavates down to the footing, repairs and cleans the wall, bonds a rubberized membrane to it, covers that with drainage board and filter fabric, replaces the weeping tile in clean stone and backfills in layers. It stops water at the wall instead of managing it afterwards, and it takes the longest and costs the most of the common methods, so it needs to be the right fit.
When Exterior Waterproofing Is the Right Call
Digging outside is a big job, so it should answer a real problem. It makes the most sense when the foundation wall needs repair that requires access anyway, when the original clay weeping tile has collapsed, when the inside of the basement cannot be cut open because it is finished or crowded with mechanical equipment, or when the yard is already being disturbed by a driveway, addition or landscaping project. In those cases the excavation does several jobs at once.
It is not the default for every damp basement. A light dampness, a single crack or condensation usually points to a smaller fix, and a tight side yard or a shared wall can make an exterior dig impractical. Our guide to interior versus exterior waterproofing compares the two approaches side by side, and the overview of basement waterproofing methods explains the individual components. If you are still working out what is wrong, start with the signs you need basement waterproofing.
Before Anyone Digs: Assessment, Permits and Locates
The work starts on paper. A good contractor inspects the basement and the exterior first, looks at where water is entering, checks the grading and downspouts, and decides whether exterior work is justified or whether a lighter method would solve the problem. They also look at access: how wide the side yards are, where a machine can sit, where the soil can be stacked and what stands in the way, such as trees, steps, a gas meter or an air conditioning unit.
- Permit check: excavation close to a foundation, especially a deep one or one near a property line, may need a building permit from the City of Toronto. Your contractor should assess this at the start and manage the application. Our waterproofing permit guide explains what the City looks at.
- Utility locates: buried gas, electrical, water and communications lines are located and marked before digging begins. Ask who requests the locates and when.
- Shoring decision: the depth of the trench and the soil conditions decide whether the walls of the excavation need to be shored for worker safety. This is a safety and engineering call, not an upsell.
- Protection plan: mature trees, fences, air conditioners, downspouts and walkways are protected or temporarily moved, and the plan for putting them back should be in the quote.
Stage 1: Excavation to the Footing
On most Toronto lots the soil is dug by a mix of machine and hand. A small excavator removes the bulk of the soil where it fits, and the crew finishes by hand close to the wall so they do not damage the foundation, pipes or wiring that run through it. The trench is taken down to the top of the footing so the whole below-grade face of the wall is exposed, and it is wide enough for people to work safely and to fit the drainage layers.
Access is the biggest variable. A detached house with a clear side yard can often be dug mostly by machine, while a narrow semi-detached lot may need more hand digging and soil carried out through the front. Whatever the lot, topsoil and clean stone are kept separate from clay so the yard can be restored properly. The excavation is also the first real look at the wall, and it is common for the crew to find something the interior view could not show, such as a cracked joint, an old patch or a failed tar coat.
Stage 2: Wall Cleaning, Inspection and Repair
A membrane is only as good as the surface it is bonded to, so the wall is cleaned before anything is applied. Old tar, loose material, roots and soil are removed. Then the wall is inspected closely. Cracks, voids, form-tie holes and the points where pipes enter the house are repaired with hydraulic cement, epoxy or a patching compound suited to the material, and any structural movement is flagged for the engineer.
- Poured concrete: hairline and through-cracks are sealed, and honeycombed or crumbling areas are patched back to sound material.
- Block and masonry: open mortar joints are repointed or filled, and bowing or stair-step cracking is reported, because that is a structural question rather than a waterproofing one.
- Penetrations: water lines, gas lines, sewer stubs and electrical conduits through the wall are sealed carefully, because they are common entry points.
If the inspection shows that the foundation itself needs work, this is the cheapest moment to do it, because the wall is already exposed. Our foundation repair team and our engineers can be brought in before the membrane goes on, not after.
Stage 3: Membrane Application
BaseWorks uses a rubberized asphalt membrane on most residential exterior projects. It is applied to the clean, repaired wall from the footing up to grade, covering the cracks that were patched and the wall penetrations. The rubber stays flexible through Toronto freeze-thaw cycles, which is why it is preferred to a thin tar coating that can crack over time. The membrane is the waterproof barrier, and the layers that follow protect it.
Product details matter here. Surface preparation, whether a primer is required, how thick the membrane must be and the temperature and cure conditions it needs are set by the manufacturer's data sheet, and a careful crew follows it. Ask your contractor which product they use, how they check the thickness and how they finish the top edge at grade so water cannot run behind the membrane. Rain on a fresh membrane or a membrane applied to a damp, dirty wall are the two avoidable ways this stage goes wrong.
Stage 4: Drainage Board and Filter Fabric
Over the membrane goes a dimpled drainage board. The dimples create a small air gap that lets water slide down the face of the wall to the footing instead of pressing against the membrane. Over the board goes a geotextile filter fabric, which lets water through but keeps fine soil particles from clogging the stone. Together they relieve the hydrostatic pressure that Toronto's clay soil builds against a foundation wall, and they protect the membrane from sharp stones and backfill.
Clay is the reason these layers matter in this city. It holds water against the wall long after the rain stops. Our guide to basement waterproofing in clay soil explains why the drainage layers are as important as the membrane.
Stage 5: New Weeping Tile at the Footing
Most Toronto houses built before about 1980 have original clay tile around the footing that has collapsed or filled with silt. If it is left in place, an exterior membrane has nothing to carry the water away. So the old drain is removed, and new perforated pipe wrapped in filter fabric is laid at the footing in clean crushed stone. The pipe is connected to the storm sewer or to a sump system, according to what the site allows and what the City permits.
Two things are worth confirming before work starts: where the water will go and whether a sump or backwater arrangement is part of the plan. Our weeping tile installation page explains the drain on its own, and the guide to sump pump versus weeping tile explains how the two work together.
Stage 6: Backfill, Grading and Restoration
The trench is backfilled with clean drainage stone against the wall, then with engineered or well-compacted fill brought up in layers to grade. Compacting in layers keeps the ground from settling later and leaving a dip beside the house where water collects. The soil is graded so the surface slopes away from the foundation, downspouts are reconnected and pointed away from the wall, and walkways, pavers, concrete or landscaping are put back to their earlier condition.
Restoration is part of the job, not an extra. A fixed-price quote should state exactly what is put back: grass or sod, pavers, concrete slabs, planting beds and fences. It should also say what is not included, such as mature shrubs or decorative features that are difficult to protect.
The Process at a Glance
| Stage | What happens | What to check |
|---|---|---|
| Excavation | Soil removed to the top of the footing, machine and hand digging | Shoring plan, locates done, topsoil kept separate |
| Wall prep | Cleaning, crack and penetration repair, inspection | Photos of the bare wall, any structural findings reported |
| Membrane | Rubberized asphalt bonded from footing to grade | Product and thickness, clean dry surface, sealed top edge |
| Drainage layers | Dimpled board and filter fabric over the membrane | Continuous coverage, no gaps at corners |
| Weeping tile | Old drain removed, new pipe in clean stone | Where it drains, sump or storm connection |
| Backfill | Stone against the wall, fill in compacted layers | Grade slopes away, downspouts redirected |
| Restoration | Landscaping, concrete or pavers put back | The quote lists exactly what is restored |
How Long It Takes and What It Costs
A full perimeter project typically takes 5 to 10 working days depending on foundation depth and soil conditions, and excavation is weather dependent, so BaseWorks schedules exterior projects from spring through fall when ground conditions suit the work. A permit, where one is needed, adds lead time before digging begins.
Published pricing from our exterior waterproofing page runs from about $8,000 to $16,000 for a single wall, about $18,000 to $30,000 for a full perimeter on a typical Toronto semi-detached home, and about $28,000 to $45,000 for a larger or deeper house. Every project is quoted at a fixed price that includes permits, excavation, membrane, drainage board, weeping tile, backfill and restoration. For what moves the number up or down, see our basement waterproofing cost guide.
Questions to Ask Before You Sign
- Which membrane product is used, and how is the thickness checked?
- Is the old weeping tile being replaced, and where does the new drain discharge?
- Who handles the permit and the utility locates?
- What is restored afterwards, and what is not?
- Will I see photos of the bare wall and the finished layers before backfill?
- What does the warranty cover, and is it transferable? Our guide to waterproofing warranties explains the terms to look for.
If the answer to a damp basement turns out to be something lighter than a full excavation, our guide on what sealants can and cannot do explains where surface products help and where they do not.
Getting an Honest Assessment
The right first step is a free assessment that identifies where the water is coming from and recommends interior, exterior or a combination, with a written fixed-price quote. BaseWorks manages the permit, the excavation, the membrane and the restoration. To book yours, call (437) 291-7723, or read the overview of basement waterproofing in Toronto first if you want the background.
Frequently Asked Questions
Exterior basement waterproofing excavates the soil around the foundation, repairs the wall, bonds a rubberized membrane to it, adds drainage board and filter fabric, replaces the weeping tile and backfills. It stops water at the wall instead of managing it after it enters, which is why it is considered the thorough option when the yard allows it.
A full perimeter project typically takes 5 to 10 working days, depending on foundation depth and soil conditions. Excavation is weather dependent, so exterior work is scheduled from spring through fall. If a building permit is needed, allow extra lead time before digging begins.
Excavation close to a foundation may need a building permit from the City of Toronto, especially for deeper foundations or work near a property line. BaseWorks assesses permit needs at the assessment stage and manages the application, and our permit guide explains what the City reviews.
Our published pricing runs about $8,000 to $16,000 for a single wall, $18,000 to $30,000 for a full perimeter on a typical semi-detached home, and $28,000 to $45,000 for a larger or deeper house. Every project is quoted at a fixed price that includes permits, restoration and weeping tile.
Exterior stops water before it reaches the wall, while interior drainage collects water after it enters and sends it to a sump. Exterior is more thorough but costs more and disrupts the yard. The right choice depends on where water is entering, access and budget, and an assessment will tell you.